Friday, August 28, 2009

Whelping Box -- never heard of one, but built one


Our neighbor and good friend's chocolate lab, Keely, is having puppies. Well, I was asked to help build a Whelping Box. "I have no idea what one is, but I am in...let's do it," was my reply. Now, I guess if I bred dogs, I'd know. As I found out, the internet is filled with whelping boxes you can purchase, build, etc. Some enterprising people are even using children's swimming pools...successfully.

Well, a whelping box is simply a box large enough to accommodate the pregnant mother where she can "nest" to deliver the puppies and then ultimately nurse them for 6 to 8 weeks. The specs are based on the size of the dog, but the requirements are simple. Build a box large enough to hold momma, however many puppies she may have, and provide them all the ability to nurse, cuddle, sleep and do other adorable doggie stuff. The box walls need to be high enough so the puppies can't get out (especially once they become curious at a few weeks old) and low enough for momma to come and go as she pleases.

This was a simple 2 hour, less than $100 project.
  • 2 sheets 3/4" 4x8 plywood
  • 2 10' 2x4s
  • 8 door hinges (ones with removable pins)
  • 2 latches
  • a few drywall screws
  • plastic
Since we're building for a lab, we decided the to make the box 4' x 5' with 20" high sides. We will hinge one side in the middle to allow for easier momma access, especially when the pups are small. We can then raise this side for max height once they begin to grow. Now you may ask, why all the hinges. We decided to make the box quick and simple to break down. So instead just screwing the sides together, we used door hinges on each corner. Pop all the pins and we have 5 flat sheets of plywood to store.

Here's what we did. Cut the 4 sides. Two at 20" x 4' and two at 20" x 5. We then took one of the 4' sides and ripped it down into two equal 10" x 4' pieces. We hinged this piece in the middle. We then used hinges on each corner create a rectangular box. We used 2 hinges on the fixed corners and one hinge on the bottom of the hinged-side corners. The latches were used to hold the top of those two corners together. Once the rectangle was built, we cut the a 46" x 5' piece to fit in the bottom. We covered this in plastic to resist being too saturated in urine. We laid the 2x4's cut to 5' lengths in the bottom of the box to act as floor joists and raise the bottom off the ground a bit.

Simple, cheap, easy. Now all we need to do is fill it with blankets and let nature take its course. I definitely don't want to be around for that.

Tuesday, August 18, 2009

Office Cube Panels -- Part 1


Our business is moving offices. In our current space, everyone has an office. In our new one, we have some offices and a few large rooms where several people will have to share the space. We looked at cube walls...expensive at $1000 or more per cube, even for used. And you better like grey, sea foam, or mauve fabric walls...YUK! So I've decided to build some self-supporting panel walls that will create three 8' x 10' offices. At that size, they will accommodate our current furniture. Plus, and more importantly, we can customize, choose the surface, etc. Anyway, I built some test panels and we've decided to go with simple clear-coated pine and birch for a clean, natural design. My hope is that I will be able to create three offices for less than $700.
So here's the plan. Each panel will be made of a simple rectangular frame of 1" x 3" select pine. Each panel will be 4' wide by 6' high. The frames will be filled with 1/4" cabinet grade plywood. Each cube will then be constructed with 4 panels to make 2 walls. I'll use a simple T design so that the structure will be self supporting (we'll use windows and the building walls as the other 2 walls). I'm sure I'll have to also create some small 1' wide panels for some added support, but this should all work.
I started by cutting all the pine I needed for the frames. I rabbited the edges to accept the 1/4" ply and I rabbited the ends of the vertical sides to accept the horizontal tops and bottoms. Next step assemble the frames and start fitting the panels in. There are quite a few more details involved...connections, inner supports, etc...that I will share in future posts. But we are off and running. I searched and searched online for projects like this and couldn't find any. There were some that were just cheap, slapped up temporary walls, but nothing that looked good and was economical. If anyone out there has done something like this or seen something like this online, I'd love to know about it. Stay tuned, more to come.

Sunday, August 2, 2009

Hot Tub Heaven


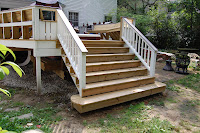
So my neighbor, Kevin-the-attorney, bought a hot tub for his deck. It's great. They love it, the kids love it after sports, but at 7'x7' it took up a good portion of his current 400 square foot deck. So I said, let's build out the deck and sink the tub for a custom look. Good times all around as far as I'm concerned. We had lots of high school aged boys for the post hole digging and heavy lifting. We laid out a couple of designs and settled on a trapezoid that would tie in seamlessly to the old deck. Our plan actually calls for two decks as you can see from the underneath shot. We started by building an 8'x8' square deck about a foot off the ground. This deck is set on four 6"x6" posts with 2"x12" beams and joists. This is what the tub sits on. It is completely freestanding and does nothing but carry the weight of the tub and water. Once we built it and sited the tub, we built the rest of the deck around it. It is completely freestanding and literally floats around the hot tub. Thankfully the existing deck had its posts right on the rim joists so tying in was easy. We situated the joists strategically and screwed in the decking on one side so there is access to the tub's maintenance panel. At first we we're just going to go with railings like the existing deck, but then my brother-in-law, Mark-the-architect, (DANGER, DANGER, WHEN EVER AN ARCHITECT SHOWS UP IT'S GOING TO COST YOU MORE MONEY) showed up and suggested seating. Well, while it cost a little more in time and money, it really made the deck. The seats in my opinion really make the whole deck and area around the tub usable. We built the seat stringers/supports using a simple upside down 4, attached them the deck support posts that run into the ground and we had amphitheater seating. We were also careful to incline the back supports to the seats for max comfort. I hate decks with 90 degree seats. That's taking the easy way out. Anyway, we finished it off with 7' stairs that empty into the backyard. We still need to run lattice along the skirts, but all in all a good time was had by all. Now to go enjoy 10 or 12 cold ones in the tub.