Wednesday, December 16, 2009

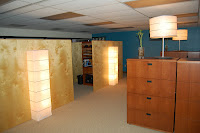
Office Cube Panels -- Finishing & Finished


Well the office cubes have been finished and installed for some time now...it's just been very busy all around. Here's the story. After sanding, I applied 2 coats or clear Minwax semi-gloss polyurethane. This is always my go-to as it goes on smooth. I used by trusty Purdy China bristle brush to do the edges and detail work. Since the panels have so much flat surface area, I tried something new. Rather than go with a brush for the whole job, I tried rolling. At the suggestion of several friends, I purchased a Purdy Parrot series roller cover...this is made specifically for oil-based clear coatings. I was worried about bubbles, etc. Well, I shouldn't have been. The poly rolled on smooth and clear. I was done with my 2 coats in no time and ready for install.

The install went easier than I thought. With a little help from 2 co-workers, we flipped the panels up and bolted them together...very tight on the fingers as you can see from the bolt holes I left, but the finished effect is no visible fasteners. Overall, we've had lots of complements on the new office..."sleek, green, Swedish-looking." Most importantly, the cubes and wall create the privacy we need for about one-third the price of refab cubes. Check it out. I'd love to hear thoughts.

Wednesday, October 21, 2009

Office Cube Panels -- Part 2


Wow, this is a huge job, but definitely satisfying. Well, all the panels are constructed. Just to recap thats: 11 4'x6' panels, 3 18"x6' panels, and 3 12"x6' panels. Now to the finishing. I filled all the nail holes that attached the plywood panels to the frames. I used my trusty Porter Cable brad nailer and compressor with 18 gauge brand to attach the 1/4" plywood. So every panel had 25 to 30 nail holes on each side. I have to admit the sanding wasn't a fun job. My Bosch detail sander was perfect for smoothing out the filler on the nail holes and the Porter Cable half-sheet sander was great for finishing off the job. I was very tedious given the number of panels, but I plugged in my iPod and spent the day getting it done. Now all the panels are ready for finish. I need to get on this because we are moving into our new office so these need to get done. Stay tuned for lots of posts as this project winds down.

Friday, August 28, 2009

Whelping Box -- never heard of one, but built one


Our neighbor and good friend's chocolate lab, Keely, is having puppies. Well, I was asked to help build a Whelping Box. "I have no idea what one is, but I am in...let's do it," was my reply. Now, I guess if I bred dogs, I'd know. As I found out, the internet is filled with whelping boxes you can purchase, build, etc. Some enterprising people are even using children's swimming pools...successfully.

Well, a whelping box is simply a box large enough to accommodate the pregnant mother where she can "nest" to deliver the puppies and then ultimately nurse them for 6 to 8 weeks. The specs are based on the size of the dog, but the requirements are simple. Build a box large enough to hold momma, however many puppies she may have, and provide them all the ability to nurse, cuddle, sleep and do other adorable doggie stuff. The box walls need to be high enough so the puppies can't get out (especially once they become curious at a few weeks old) and low enough for momma to come and go as she pleases.

This was a simple 2 hour, less than $100 project.
  • 2 sheets 3/4" 4x8 plywood
  • 2 10' 2x4s
  • 8 door hinges (ones with removable pins)
  • 2 latches
  • a few drywall screws
  • plastic
Since we're building for a lab, we decided the to make the box 4' x 5' with 20" high sides. We will hinge one side in the middle to allow for easier momma access, especially when the pups are small. We can then raise this side for max height once they begin to grow. Now you may ask, why all the hinges. We decided to make the box quick and simple to break down. So instead just screwing the sides together, we used door hinges on each corner. Pop all the pins and we have 5 flat sheets of plywood to store.

Here's what we did. Cut the 4 sides. Two at 20" x 4' and two at 20" x 5. We then took one of the 4' sides and ripped it down into two equal 10" x 4' pieces. We hinged this piece in the middle. We then used hinges on each corner create a rectangular box. We used 2 hinges on the fixed corners and one hinge on the bottom of the hinged-side corners. The latches were used to hold the top of those two corners together. Once the rectangle was built, we cut the a 46" x 5' piece to fit in the bottom. We covered this in plastic to resist being too saturated in urine. We laid the 2x4's cut to 5' lengths in the bottom of the box to act as floor joists and raise the bottom off the ground a bit.

Simple, cheap, easy. Now all we need to do is fill it with blankets and let nature take its course. I definitely don't want to be around for that.